1、安装mysql
yum install mysql
yum install mysql-server
这样装,如果两个放一起装,很好容易出错,或者服务端装不上
systemctl start mysqld.service
systemctl enable mysqld.service启动mysqlserver
mysqladmin -u root password [your_password_here]为mysql设置密码
mysql -h localhost -u root -p链接mysql
开机自启
[root@localhost roowe]# chkconfig –levels 235 mysqld on
检查MySQL有木有在运行两种方法
| [root@localhost roowe]# netstat -tap | grep mysql |
tcp 0 0 :mysql *: LISTEN 6100/mysqld
或者使用命令
systemctl status mysqld.service
使用下面命令就可以连接mysql了
mysql -h localhost -u root -p
2、安装apache
[root@localhost roowe]# yum install httpd
开机自启
[root@localhost roowe]# chkconfig –levels 235 httpd on
启动apache
service httpd start
输入命令ifconfig查下自己的ip,我的是192.168.110.128,在浏览器输入http://192.168.110.128即可看到Apache的默认页面。
在Fedora上Apache的默认文档路径在: /var/www/html,配置文档在: /etc/httpd/conf/httpd.conf, 附加的配置文档在: /etc/httpd/conf.d/ 目录下。
这里本机已经可以访问了,不过局域网内如果访问还要设置一下防火墙
同样也需开启防火墙80端口
#iptables -A INPUT -p tcp –dport 80 -j ACCEPT
也可以将上述参数加入防火墙配置中:
#vi /etc/sysconfig/iptables
加入:-A INPUT -m state –state NEW -m tcp -p tcp –dport 80 -j ACCEPT
保存后重启iptables即可
重启防火墙,这里有两种方式重启防火墙 a) 重启后生效
开启: chkconfig iptables on
关闭: chkconfig iptables off b) 即时生效,重启后失效
开启: service iptables start
关闭: service iptables stop 再次从客户端访问,成功!
这是在别的局域网也能过了
改一下配置文件
1 #vi /etc/httpd/conf/httpd.conf
2 # line 43: change
3 ServerTokens Prod
4 # line 75: change to ON
5 KeepAlive On
6 # line 330: change (enable CGI and disable Indexes)
7 Options FollowSymLinks ExecCGI
8 # line 337: change
9 AllowOverride All
10 # line 401: add file name that it can access only with directory’s name
11 DirectoryIndex index.html index.cgi index.php
12 # line 535: change
13 ServerSignature Off
14 # line 758: make it comment
15 #AddDefaultCharset UTF-8
16 # line 795: uncomment and add file-type that apache looks them CGI
17 AddHandler cgi-script .cgi .pl
3、安装php
root@localhost roowe]# yum install php
重启apache
service httpd restart
Apache默认的网站执行目录在: /var/www/html目录下,在里面新建info。php
就可以通过访问ip/info.php查看php版本了
下面这些都装上吧,都是php扩展的一些东西,现在不装以后需要也要装
[root@localhost roowe]# yum install php-mysql php-gd php-imap php-ldap php-odbc php-pear php-xml php-xmlrpc php-eaccelerator php-magickwand php-magpierss php-mapserver php-mbstring php-mcrypt php-mhash php-mssql php-shout php-snmp php-soap php-tidy
其中如果你发现apache突然不能用了,查看运行状态时已经
httpd.service - The Apache HTTP Server (prefork MPM)
Loaded: loaded(/usr/lib/systemd/system/httpd.service; enabled)
Active: failed (Result: resources) since Tue, 16 Oct 2012 14:45:28 +0800; 1min 24s ago
Process: 837 ExecStart=/usr/sbin/httpd $OPTIONS -k start (code=exited, status=0/SUCCESS)
CGroup: name=systemd:/system/httpd.service
重启apache
[root@localhost ~]# service httpd restart
Redirecting to /bin/systemctl restart httpd.service
Job failed. See system journal and ‘systemctl status’ for details.
出现这种错误,那么你的selinux正在起作用
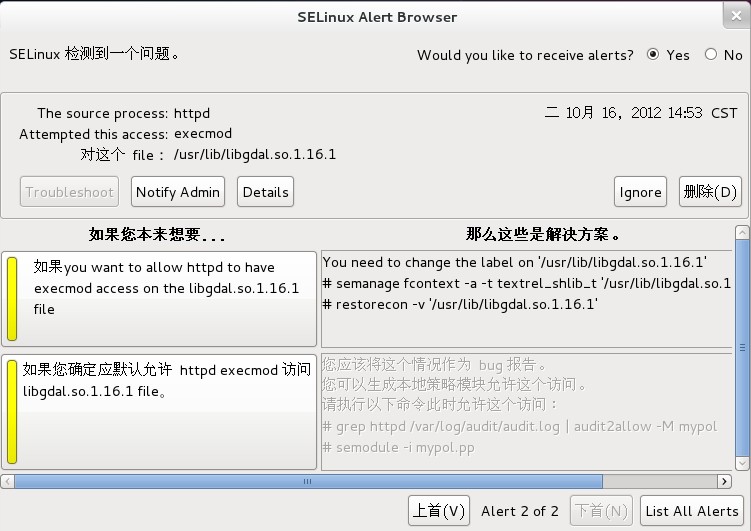
到你的图形界面上已经有提示了
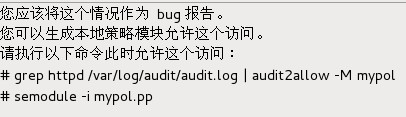
到你的图形界面上已经有提示了
按照图片上的命令执行。
如果根据提示还是不能重启apache的话,那就把这个selinux关了吧,如果你自己开发使用,然后卸载apache,重新安装即可。
3-安装PhpMyAdmin
yum install phpmyadmin
service httpd restart
通过http://ip/phpmyadmin访问后台。
这个时候如果你是使用的虚拟机,虚拟机上可以访问,但是你的主机不能访问虚拟机上的phpmyadmin
就要通过下面的设置来保证能够远程访问
phpMyAdmin安装完成后程序文件在/usr/share/phpMyAdmin目录,对应的httpd配置文件在/etc/httpd/conf.d/phpMyAdmin.conf
配置/etc/httpd/conf.d/phpMyAdmin.conf。phpMyAdmin默认配置是不允许除localhost之外的主机远程访问的:
<Directory /usr/share/phpMyAdmin/>
<IfModule !mod_authz_core.c> # Apache2.2 Order Deny,Allow
Deny from All
Allow from127.0.0.1 Allow from ::1 </IfModule>
</Directory>
为了能够远程访问phpMyAdmin,将上面的内容稍作修改就可以了:
<Directory /usr/share/phpMyAdmin/>
<IfModule !mod_authz_core.c> # Apache2.2 Order Allow,Deny
Allow from All
</IfModule>
</Directory>
- 进入/usr/share/phpMyAdmin目录,创建config.inc.php文件:
[root@centos-server /usr/share/phpMyAdmin]$ cp config.sample.inc.php config.inc.php
- 重启httpd服务:
[root@centos-server ~]$ service httpd restart
这个时候你就可以远程访问你的phpmyadmin了
下面给出了几个例子在2.4版本上的配置
- 仅允许IP为192.168.1.1的主机访问
2.仅允许192.168.0.0/24网络的主机访问
3.禁止192.168.1.2的主机访问,其他的都允许访问,
4.允许所有访问,
require all granted 注,这个可以不用加容器
5.拒绝所有访问,
require all denied 官方文档 http://httpd.apache.org/docs/2.4/howto/access.html

